Showing posts with label decor. Show all posts

Monday, April 22, 2013

Pinterest Monday #11: Burlap


Lately, I have been seeing a lot of stuff that is being done with burlap. Things I never imagine such as a table runner or a table cloth. It is quite different and brings a new spend on vintage or shabby chic decor. I am thinking of doing something with burlap, but have not decided what. When I do, I will be sure to do a post on it.

For this week, I found some really cute things you can do with burlap. So for Pinterest Monday we are going to focus on burlap.


As always, you can follow me on Pinterest by clicking on the button in the side bar or here.

To go to each of the projects, you can click on the title and it will take you to the direct site of the rightful owners of the projects.

Remember, please pin directly from the rightful owner's blog site, not from this post.

Here is what I found on Pinterest!

Burlap Wedding

Burlap
Photo Source: The Bride's Cafe
This is a post about a wedding that uses burlap in the decor and other wedding details. I love how they used burlap in the smallest detail such as hair pin to the largest detail such as the table cloth. If I could do my wedding all over again, this would be exactly what I would do. Be sure to check out the site to look at more of the photos. They are beautiful!!!

Burlap Envelop

Burlap
Photo Source: Tarnished & Tattered
Isn't this the cutest? It is burlap envelopes! Decorated with some buttons, doilies, and ribbons. This would make a cute gift for a brunch/shower with the ladies. This will be on my list of things to do...

Burlap Wreath

Burlap
Photo Source: Tatertots & Jello
This burlap wreath is cute. I love how there is some bright colors incorporated into the wreath. Jen at Tatertots & Jello always has great stuff to share. I have to say that her blogs is one of my favorites. Be sure to check her out.

Burlap Bullet Board

Burlap
Photo Source: Tidy Mom
Here is something that I am going to do for my inspiration board in my room, a burlap bullet board. I have been trying to figure out what to do with my plain boards. Now I know what I am going to do.

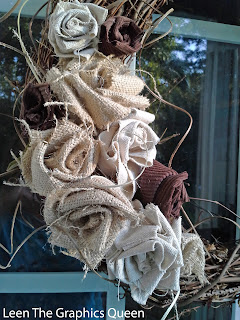
Burlap Flowers
Burlap
Photo Source: Leen The Graphics Queen
Burlap flowers would make a great accessory for any project. I have seen them used in table center pieces.

Burlap Flower Pot Cover

Burlap
Photo Source: Mark Kintzel Designs
We all have flower pots that are ugly. Here is an easy fix, cover the ugly pot with burlap

There you have it, creative ideas to use burlap in your next project. There are lots of ideas out there that are very cute and chic. I think this material will be my new love for awhile.

See you next week for Monday Pinterest...who knows what I will be finding next on Pinterest.

Don't forget you can follow me on Pinterest!

Enjoy!


Thursday, March 7, 2013

Easy DIY Heart Wall Art

I wanted to spruce up my daughter's bedroom plain walls. The DIY heart wall art is a project that you can recycle and decorate at the same time!  The best part it did not cost nothing to make because I had the old wire coat hangers and the scrap fabric. The DIY heart wall art is really easy to make. This is perfect for a little girls room

As you can tell there is a heart fad going on in her room. Can you see the heart garland that I crochet hanging across the window? You can find the Easy Crochet Heart here. This heart theme purely by accident. But I think it fits her well because she wears her heart on her sleeves. Even at the age of 6, her heart keeps getting broken.......sigh.......yes......by a boy. I know, she is too young for this. All she wants is for him to be her friend and to quit running from her when she says hi. She just wants to play. This poor girl cried when he completely ignored her. She waited until she was in the car to let loose the tears. It broke my heart to see her this way. I do not remember having this problem at that age. I was too interested in my toys and playing outside.  If this is what I am dealing with at 6 in a half, what is it going to be like in 10 years? I am thinking I am in a world of trouble.....sniffle.

Now on to the DIY Heart Wall Art. As you can see I made three hearts, two pink and one white.

DIY Wall Art
Photo Source: Creative Mess


Using large wire cutter, I cut off the curved hook, this will be the bottom of the heart. Using pliers bend and shape the wire hanger into a heart. It does  not have to be perfect.

I had some scrap fabric that I cut into long stripes that is one inch wide. The pink fabric is cotton and the white is an old lace curtainYou could use any kind of material, such as ribbonburlap, or even yarn. Let your imagination go wild.

I secure one end of the fabric to the crease of the heart with some hot glue and stretch the strand to the outer edge of the heart, again with some hot glue. I kept going until I was satisfied.

You could experiment different ways of using the fabric and create a whole different kind of pattern.
DIY Wall Art
Photo Source: Creative Mess 
I hung it on the wall using small nails. You will notice in the photos how the hearts is not 100% flat which is fine. I think it gives it a nice old look to it. Also a shabby chic look.

My daughter loves her hearts. Now if I can figure out  a way to make her forget about the boy who keeps breaking her heart, I will be satisfied... ; p


Where I party!

Thursday

Design, Dining, and Diapers
Common Ground
Creative Thursday
Made in a Day
Chase the Stars
The Shabby Nest
A Peek Into My Paradise

Friday

Blogging tips